Table of Contents
One of the main objectives of the eSymbiosis project was the development of a Web Based Platform for Industrial Symbiosis communities,offering automation, supporting SMEs and enabling public administrators(municipalities, regional offices) to implement their environmental policy.
Industrial Symbiosis is an association between two or more industrial facilities or companies in which the wastes or byproducts of one become the raw materials for another. Within a digital industrial symbiosis ecosystem, companies improve Resource efficiency, trade material, energy or water and share assets, logistics services and expertise.
The eSymbiosis Platform:
- Is a bilingual web-based platform (supporting both English and Greek), which enables users to participate in industrial symbiosis activities.
- Supports ontology-based semantic matching of shared and requested Resources in order to identify possible synergies; collaboration tools enables stakeholders' communication within the same environment.
- Is powered by the model driven development environment zAppDev©.
A user that visits the website for the first time, needs to register by selecting "Register Today!" in order to use the platform.
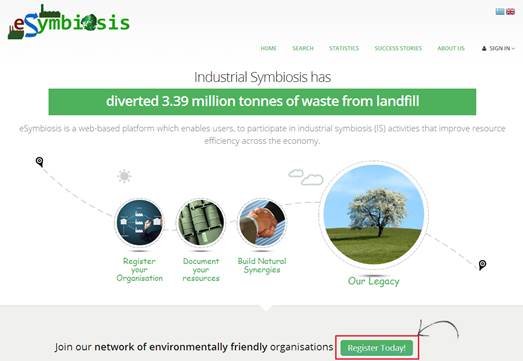
Image1: Home Page
In the screen that follows, the user that represents the Organisation, adds his/her user account details, by providing basic information such as title, name, and e-mail.
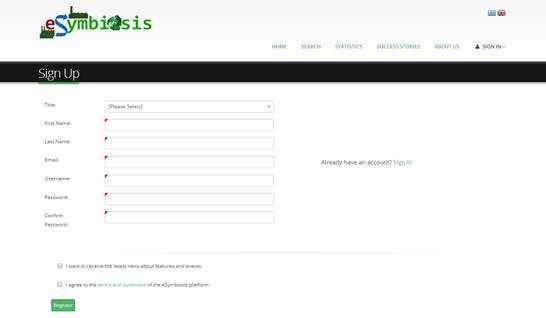
Image2: Adding Registration Details
Next, the user receives the following email message with a link to verify the specified email address.
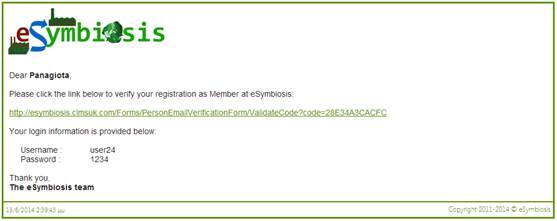
Image3: Verification E-mail
By clicking on the provided link, user is redirected to the website and his/her email address is registered as verified.
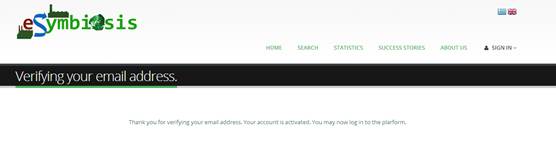
Image4: Registration Verification Message
A second email message is received informing the user regarding the successful email address verification and the registration completion.
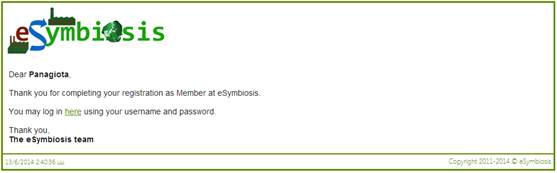
Image 5: Registration Completion Message
The User may now login with his/her credentials, in order to start using the platform functionality.
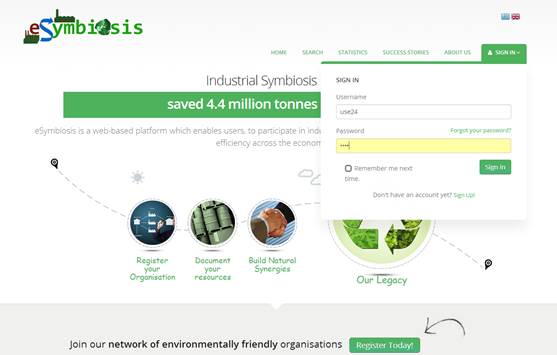
Image 6: User Sign In
The User is guided to complete his/her profile by messages that appear below the top menu.
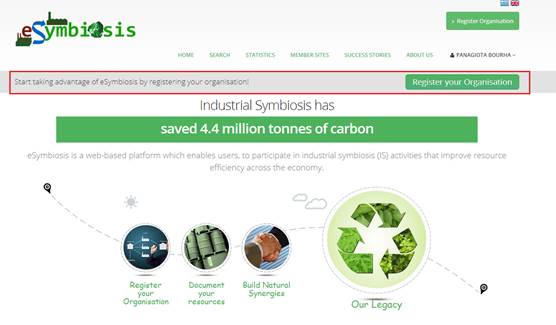
Image7: User Guidance Message
The User of an Organisation can fill in the Organisation details, following a multi-step process, as presented in the following screenshots:
In the following screen, the user has to provide the basic Organisation information, such as
- the Organisation name,
- the web address,
- the size of the organisation,
- contact details.
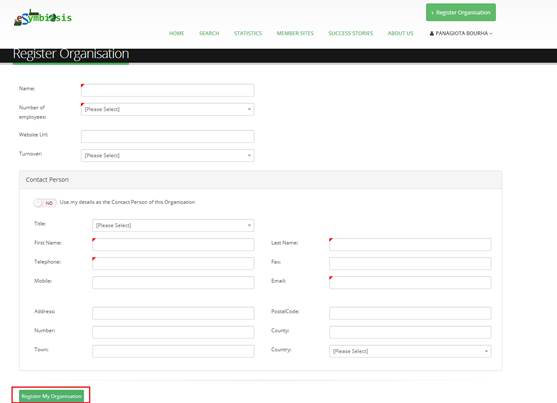
Image 8: Organisation Profile Details
The user may update this information at any later point, by entering the new details and choosing Update Organisation Details.
After registering an organisation, the User can add the organisation Sites. A Site can be a production unit, a warehouse, or a branch of an organisation.
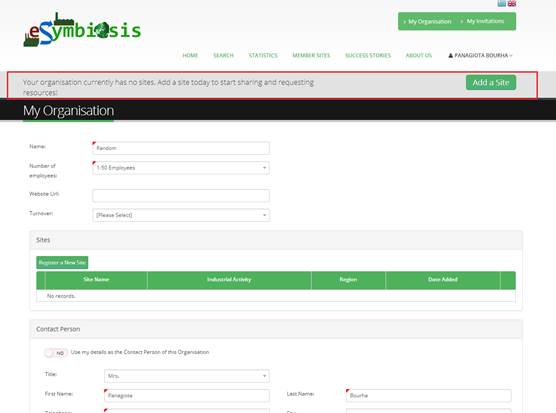
Image 9: Registered Organisation Profile
Apart from the Site details, such as name and activity sector, the user provides the geographical information of the Site. By entering the address details, the corresponding location is shown in the provided map.
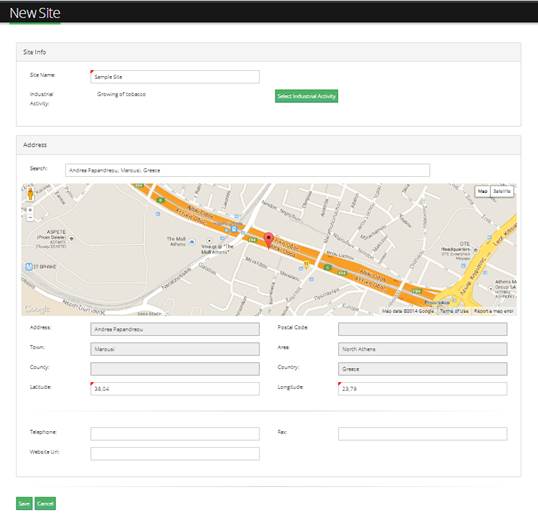
Image10: Adding Site Details
The user may access the Sites' details at any later point by clicking the corresponding menu item My Sites at the upper right of the screen.
In the "My Sites" page, the user may modify each Site’s details and also view how Sites are placed geographically, on a map.
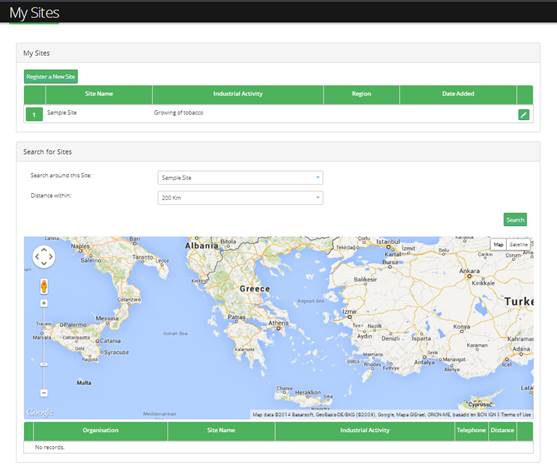
Image 11: My Sites Overview
Users may also search registered Sites from other organisations by choosing Search. The search engine displays all registered Sites on the map and a table list each Site's details including:
- Organisation
- Site Name
- Industrial Activity
- Telephone
- Distance from current user's Site.
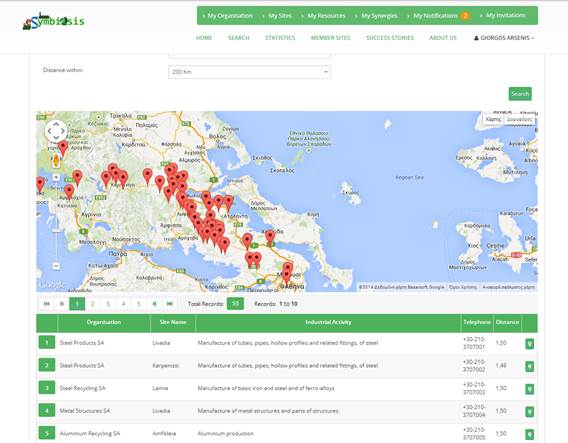
Image12: Searching Sites
Upon saving the Site information, the user can then start registering requested Resources or Resources available to share. This action initiates the Resource Registration process for the selected Site, as explained in the following section (Step 3). And upon saving the changes, the Resources are shown in the "My Resources" page.

Image 13: Sharing/Requesting Resources
Once the user has registered a Site, a Resource can be added using the Share or Request Resources button, as mentioned previously (Image 13). Alternatively the user can add Resources by choosing Resources from the Top menu (Image 14). Both choices, take the user to the Resource registration page which allows them to follow a sequence of prompts that are designed to first classify and then add details to the Resource they would like to register, either it is shared or requested.
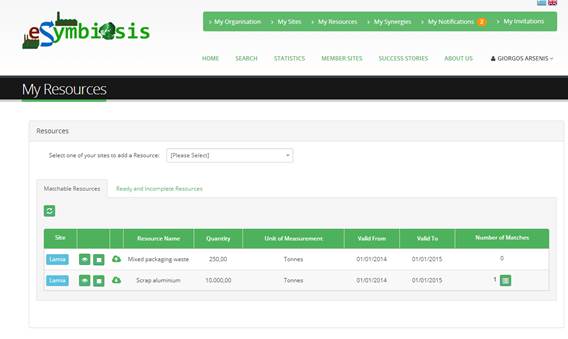
Image 14: Resources Page
During the Resource registration process, the Organisation user can specify if the Organisation's Site is:
- Offering a Resource
- Having a Technology, or
- Wanting a Resource

Image 15: Resource Registration
Selecting each option will change the right-hand pane, which allows the user to continue the registration process and add details about the Resource Type the Site can supply or requests.
By selecting the Back button on the top, the user will return to the previous view.
For example, in the case of registering a Resource to supply, clicking on the ""Type of Resource you can Supply" takes the user to a new page where he/she can choose from the different types of Resources, using the collapsible list on the left.
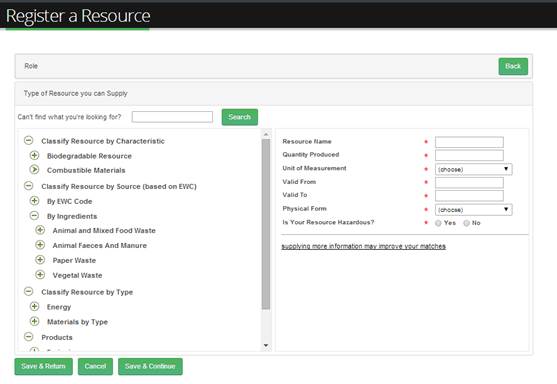
Image 16: Resource Classification Details
The user has the option of searching this list using the search box above - in this example the word "Iron" shows 10 entries and the highlighted numbers show where these can be located.
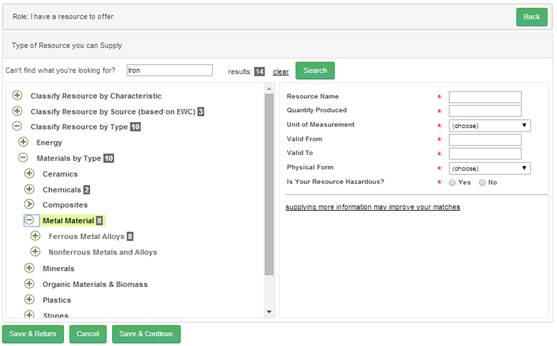
Image : Searching Resource Type
After selecting the Resource type, the user adds the properties of the Resource to the right of the classification list (Image 17) such as quantity and physical form (solid, liquid, etc.); red asterisks represent those fields that are required to be filled in before the registration can be approved.
Finally the user can choose to save his/her entries and continue adding more Resources using the "Save & Continue" button, discard unsaved responses using the "Cancel" button, or both save and return to the Site overview page using the "Save & Return" button.
The Resources page presents a list of all the Organisation's Resources per Site, classified in categories:
- Matchable Resources (Those Resources for which a potential match has been found).
- Ready and Incomplete Resources (Resources with incomplete Information or Resources for which a search match hasn't been performed).
- Resources in Synergies (Resources that have already resulted in synergy).
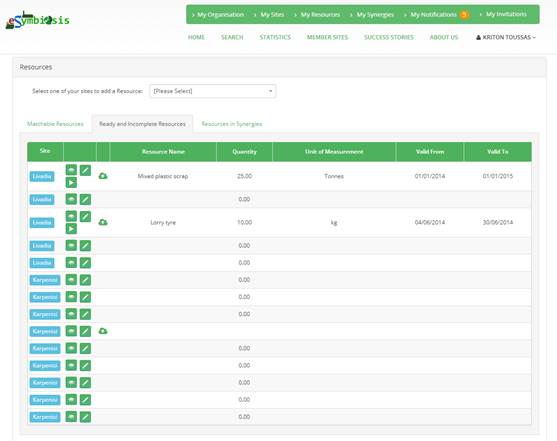
Image 18: Resources Page - Resource Categories
The User can view or edit the details of a registered Resource or withdraw it, if it is no longer available, using the buttons next to the Resource name.
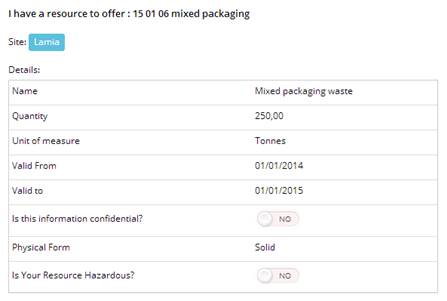
Image 19: Viewing Resource Details
In order to initiate a search for potential synergy matches with other available Resources, the user has to click on the Search button, in the Resource details, as shown below.
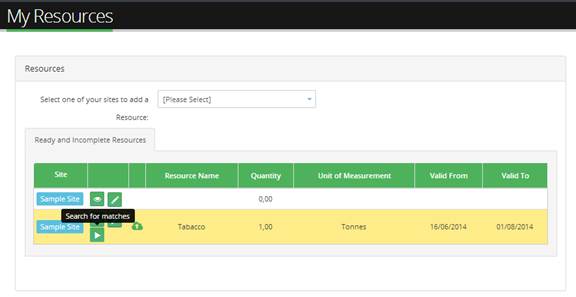
Image 20: Searching for Resource Matches
When this action is selected, the mechanism retrieves matching Resources for potential Synergies.
For a selected Site, the user can see the retrieved matches for each of the Site's available Resources, by clicking the View List of Matches button from each row of the Resources table.
For example, the following screen shows that for each of the Site Resources, there are multiple (four) potential Resource matches.
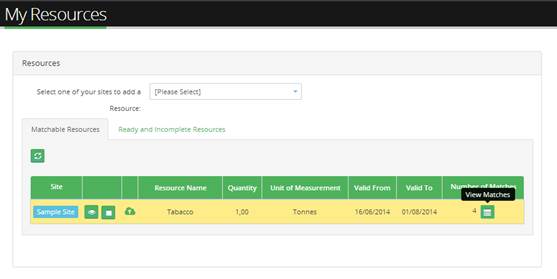
Image 21: Matchable Resources
By clicking View, the user can view the details for the retrieved matches of the selected Site Resource. If a Resource match seems compatible, the Organisation user can select the Create Synergy action with the specific Resource match.
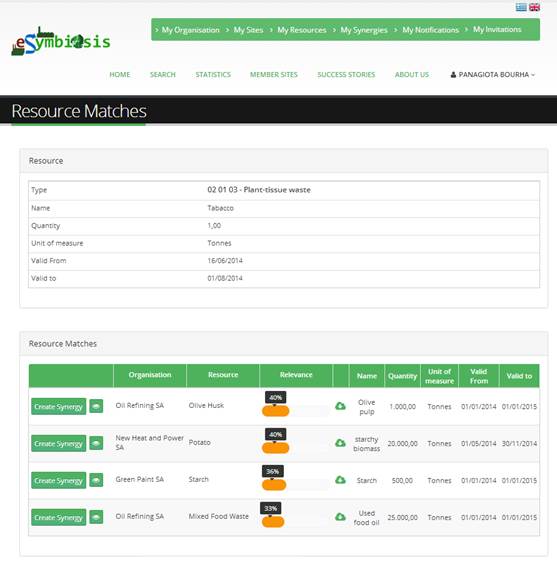
Image 22: Resource Matches Details
This action creates a new Synergy and the corresponding Synergy form is shown to the user, as explained in more detail in the following section.
In the Synergy form, the two participating Organisations can:
- View details about the other participant
- View details about the Resource match, the properties of the Resources, etc.
- Submit their agreement to proceed to the next step of the Synergy lifecycle.
- Block the Synergy process for a specified reason, so that the IS Practitioner will have to be involved to resolve the issue and unblock the Synergy.
- Submit comments for the other participating Organisation.
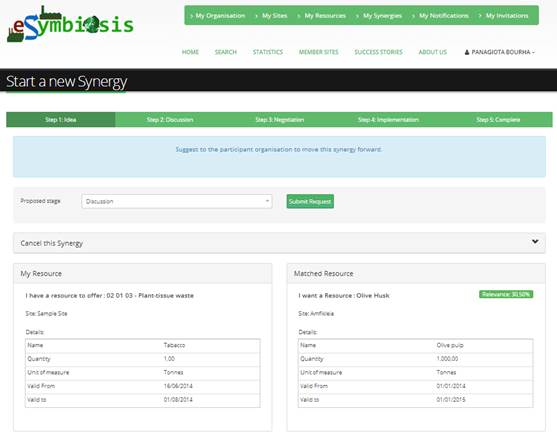
Image 23: Staring a New Synergy (1)
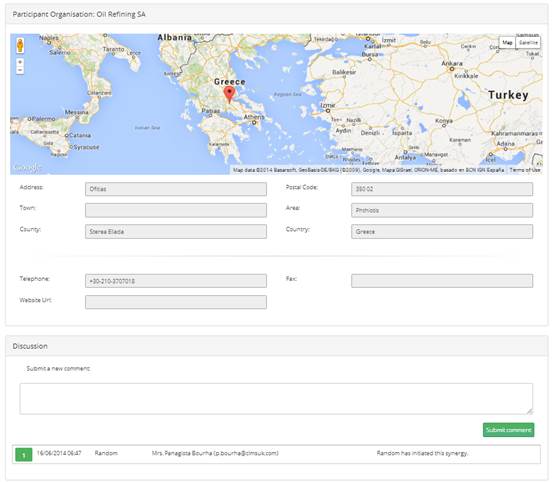
Image 24: Staring a New Synergy (2)
The Synergy lifecycle has the following steps, as indicated in the corresponding screen:
- Discussion
- Negotiation
- Implementation
- Completion
To progress from one step to the next, both Organisations have to agree that they are ready to proceed, by selecting the corresponding drop-down list (i.e. Implementation) and clicking Submit Request.
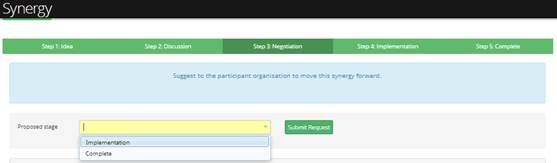
Image 25: Moving Synergy Forward
Then a notification is sent to the other Organisation user, in order to review the Synergy and maybe agree to the continuation of the process. When this agreement is mutual, the Synergy progresses to the next step and a notification is sent to both parties. A notification is also sent to participants when the Synergy has been updated or blocked.
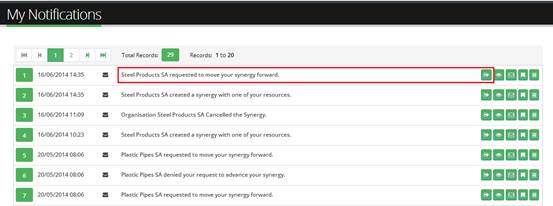
Image 26: Notifications
An example of the notification is shown below when choosing "View Message":
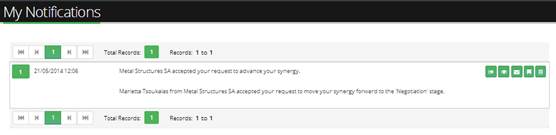
Image 27: Notification Message
When clicking on the "View the Related Synergy" button the user is transferred to the synergy page where he/she can "Accept" or "Deny" the request.
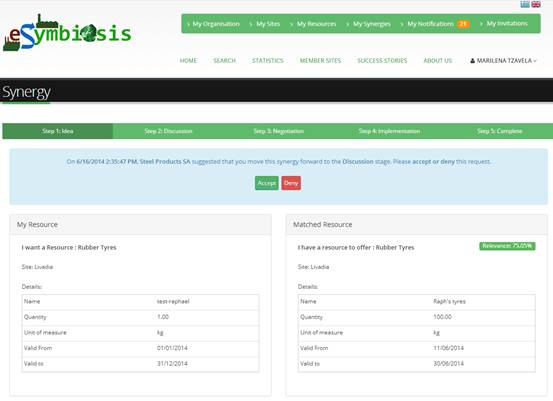
Image 28: Approving/Denying moving Synergy to the next step
The participating organisations can access all their Synergies from the corresponding option of the upper right menu:
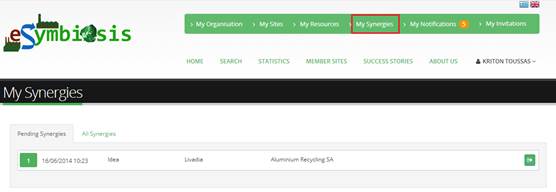
Image 29: My Synergies
Synergies are presented in categories:
- All Synergies
- Pending Synergies
- Cancelled Synergies
Clicking on the View Synergy button takes the user to the Synergy details page.
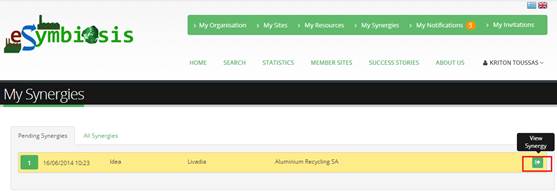
Image 30: View Synergy Button
Also, the Notifications can be viewed at any point, from the upper right menu as well:

Image 31: My Notifications (Top Menu)
A user can proceed to different actions directly from the notification message, using the buttons on the right:
- View the Related Synergy (if the message is about a synergy)
- View Message
- Mark as Read
- Bookmark Message
- Delete Message
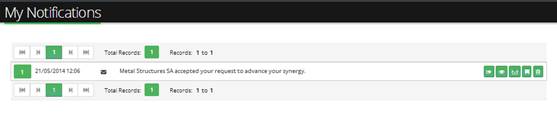
Image 32: Notification Message (Buttons)
As mentioned previously, the participating Organisations can block the Synergy progress from the corresponding option.
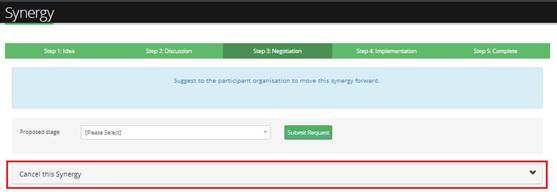
Image : Cancelling Synergy (1)
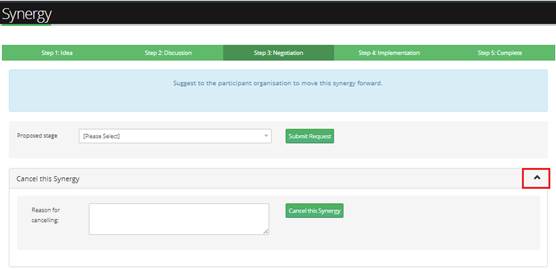
Image 34: Cancelling Synergy (2)
In case one of the two participants selects to block the Synergy progress, the IS Practitioner is notified about the issue. [Note that the IS Practitioner users are created from the Administrator].

Image 35: Justifying reason for Synergy Cancellation
The IS Practitioner is responsible for resolving the issue and can then unblock the Synergy from the corresponding button in the Synergy screen. After the Synergy is unblocked, its lifecycle can continue as normal.
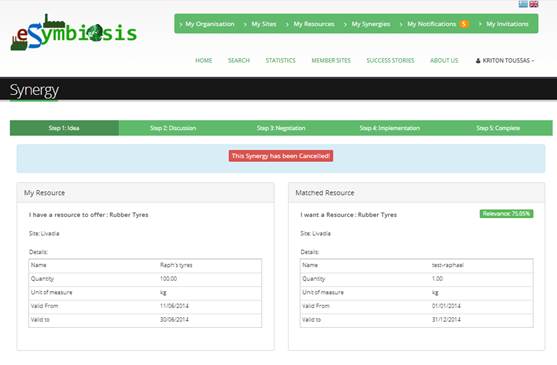
Image 36: Cancelled Synergy Details
The IS Practitioner can access his/her list of Blocked Synergies through the Synergies page accessible through the upper right menu option, as shown below, and then in the last tab of that page.
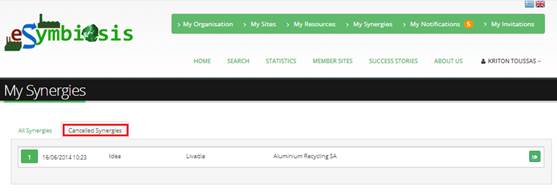
Image 37: Cancelled Synergies List
From Organisation user's perspective:
The Organisation user has to submit a number of metrics, in relation to the Synergy. These metrics can be submitted after the Synergy is completed by clicking the "Report Metrics".
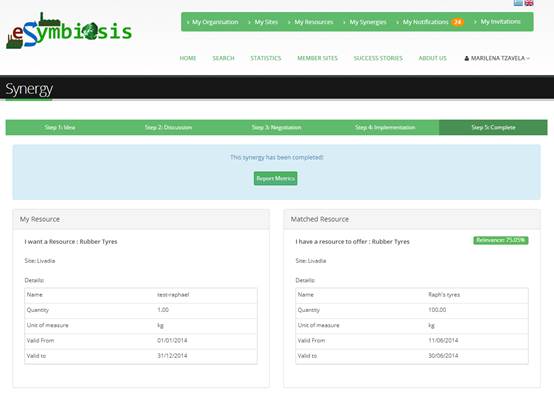
Image 38: Completed Synergy
The Organisation user can "Save a Draft" of the metrics related to a specific Synergy, and after having finished updating the filled in information, he/she can "Finalize" the report (in the metrics form, the user clicks "Finalize"); then the metrics report is sent to the IS Practitioner for review.
The metrics report include the metrics of both Organisations in synergy.
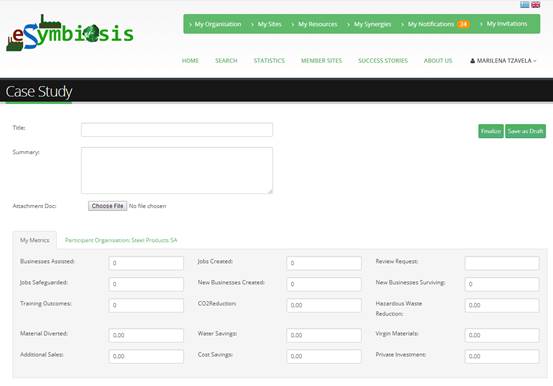
Image 39: Synergy Metrics
The IS Practitioner can view the metrics of each Synergy by going to My Synergies and choosing the Metrics icon.
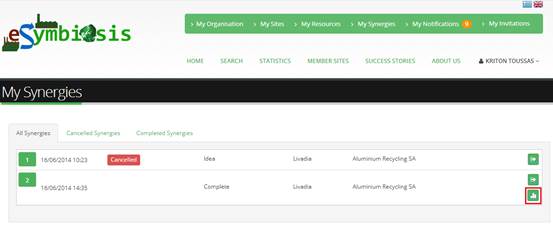 Â
Â
Image 40: View Metrics Button
When both participants of the Synergy have completed and finalized the metrics report, the report can be published as a “Success Storyâ€.
After the Synergy has been completed and the metrics of the two participating organisations have been published, the organisations can publish a new Success Story based on the Synergy and its relevant metrics. The success
story can be accessed through the "Success Stories" (top menu).
In the success story form, the Practitioner can view the metrics of the Synergy (Image 41) and can add descriptive details.
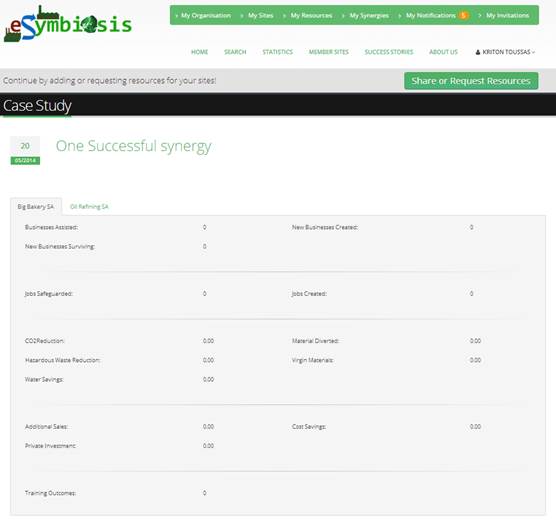
Image 41: Published Success Story
The Organisation user can view Statistics in relation to the Synergies created, the matches, the Sites per county, and the Sites per code. To access this screen, the Organisation user chooses Statistics (top menu).

Image 42: Statistics (Menu)
A view of the statistics is provided below:
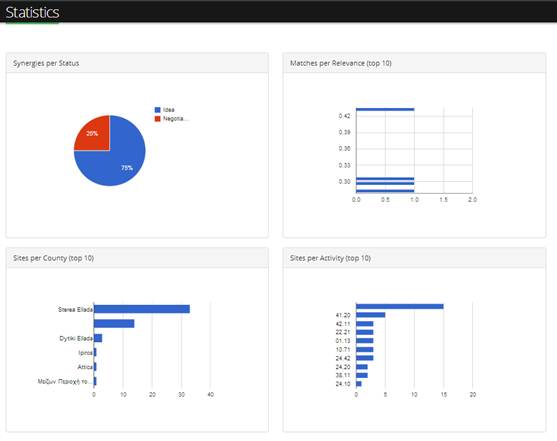
Image 43: Statistics (View)
Moreover, the user can go to Member Sites (top menu), to see the Sites located on a map and search for Sites with specific criteria.
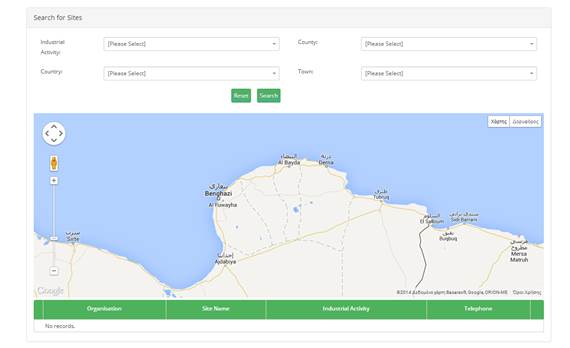
Image 44: Searching Member Sites
As shown in Image 44, the criteria that can be specified by the user are Industrial Activity, Site Town, Site County, Site Country. The user can also select one specific Organization from the list of Organizations that appear at the bottom of the page.